


The Carver C7 is our front truck designed to recreate the feeling of riding the water with a surfboard, on a skateboard. The C7 allows for amplified movement of the board thanks to its rotating arm, which allows for more speed and surf-like curves.
This amplitude that allows the C7 trick benefits the speed. It allows to pump more so that putting a foot on the ground in full ride is not necessary anymore.
Riding a Fakie is as difficult with a C7 trick as taking your surfboard upside down. It's not impossible but it's still "unstable". That's why it's only designed to be placed at the front of your board.
The C7 truck is adjustable, so everyone can find their own riding style!
With a pipewrench key you can adjust it to make it more loose or harder.
That said, this is still a skateboard truck!
Disassemble your C7 truck
- First, remove the truck from the board.
- Next, disassemble the SPRING SYSTEM by unscrewing the SPRING BOLT, located on the SPRING HOUSING of the BASEPLATE, and pull it out.
- Unhook the LINK from the LINK PIN by lifting it off the SPRING.
- Remove the SPRING and the SPRING NUT from the housing.
- Remove the ARM by unscrewing the PIVOT BOLT, located in the center of the stack of THRUST BEARINGS connecting the ARM to the BASEPLATE, while pressing on the LOCKNUT underneath to keep it nested in the BASEPLATE and prevent it from rotating.
- With the truck upside down, lift the BASEPLATE off the arm, while the THRUST BEARINGS are held stacked on the ARM.
- Remove the HANGER just like on any standard skate truck; simply unscrew the LOCKNUT and slip the HANGER and BUSHINGS off the KINGPIN.
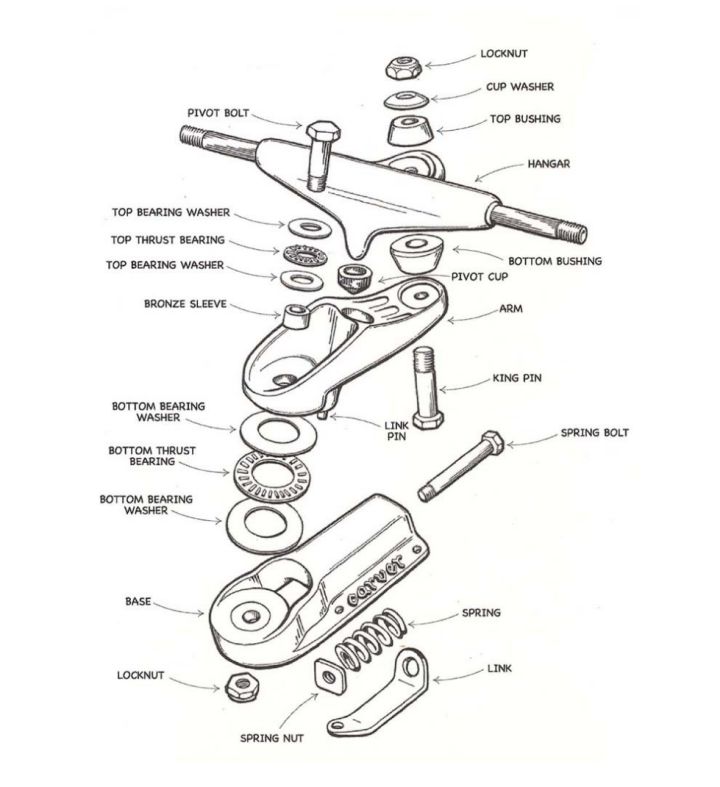
Reassemble your C7 truck
To re-assemble the truck is to follow the assembly steps but in the reverse order:
- Assemble the HANGER as you would on a standard truck.
- To attach the ARM, first stack the smaller THRUST BEARING and WASHERS onto the PIVOT BOLT. The bearing should be sandwiched between the three washers, with the pair of hardened THRUST BEARING WASHERS on either side of the THRUST BEARING and the plain TOP WASHER directly in contact with the PIVOT BOLT head.
- Slide the PIVOT BOLT into the ARM through the BRONZE SLEEVE. Turn the ARM over, holding the PIVOT BOLT in place with your finger, and stack the bottom THRUST BEARING ASSEMBLY onto the BEARING CORE on the ARM.
- Slide the BASEPLATE on and finger-start the LOCKNUT. Press the LOCKNUT into the casting so it locks in place and then tighten the PIVOT BOLT all the way down. The BEARINGS should be as tight as possible but still rotate freely. If it's too tight the ARM will bind, if it's too loose it will rattle when you ride. You may find that you need to snug it up once after riding it a bit, as the bearings seat. This bolt DOES NOT adjust tension, and should not be over tightened.
- To assemble the SPRING SYSTEM, first pace the SPRING NUT in the SPRING CAVITY against the inner casting wall.
- Drop the SPRING into the housing and push it up against the SPRING NUT.
- Hook the LINK onto the LINK PIN and press it down over the SPRING.
- Slide the SPRING BOLT into the base and screw it into the SPRING NUT, starting it by hand first to avoid cross-threading.
- Adjust to your desired tension.